Thursday, December 23, 2010

It's almost time...

Only a few more days until Santa Claus arrives!  The kids are off from school until January 3rd, the shopping is done, the wrapping is completed and now we wait....  WELL... maybe not.  We do have to clean the house, make a pie, make some marshmellow bark, do some laundry and other mundane everyday things.  You know, those things no one really likes to do.  But there will be time for crafting!  Today, I'm going to have some time to craft in between loads of laundry, I know I will!

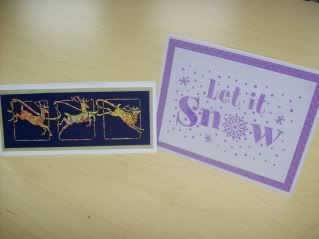
It's Thursday and that means, it's time for some stenciling!  Today, I'm showing you another oldie but goodie!  The reindeer on the left were pasted in black and then foiled using the metallic leafing.  The Let It Snow stencil was pasted in purple (no, they don't have purple - you have to make it!) and then clear glitter was added for a beautiful effect! 


Wanna know how to make purple? Add a little bit of dark purple (highly pigmented) paint to your white/pearlescent or glossy white paste and mix together until blended well. No need to go to town on the blending either, just folding the color in will work nicely. You can create 1000's of different colors now! Heck, you might be able to create 1000's of different shades of purple! Go ahead, try it!

This was a class I offered last year and they were really just about the techniques, no design elements to the cards, it was all techniques.  I believe that everyone in class got a chance to use several different stencils we had available.

I hope you have some time to craft this Holiday Season!  Have a very Merry Christmas and we'll be back next Thursday with some more designs!

Thursday, December 16, 2010

Thursday Challenge - Blue Paste!

I'm short on time this week but I do have another Dreamweaver card for you today!

This week we were Challenged with using the Blue Glossy Paste and choosing a blue/purple theme for a Holiday card. 

I used the blue glossy paste and chose to paste the ice skaters.  Before I did any pasting, though I colored my paper with blues and purples and then inked up some Stampscapes, CC Crafts and Stampers Anonymous Stamps in purple ink and created a 'scene' for my skaters.

Here's my card for this week - I hope you enjoy!

Happy Holidays to you and yours!

Thursday, December 9, 2010

It's a Dreamy Thursday!

It's Thursday, so that must mean we have some Dream Schemes over on the Dreamweaver Design Team!  This week, I'm going to follow the sketch from last week and show you another one of the new stencils done in a Christmasy way.

 
Here's the next new Valentine stencil:


By the way, you can order this stencil and last weeks stencil through your local craft store that carries Dreamweaver products.  Everyone who takes my Friday night class will get one of these for FREE!
 
 
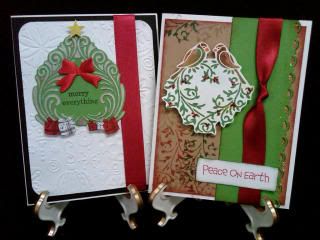
This stencil is called Love Birds and they are supposed to be sitting on a heart shaped wreath.  See it?  Beautiful, huh?!  Well, if you wanted to make these Christmasy....


Make them into partridges and add little holly berries onto the wreath.  Add some bling and people will overlook the idea that this could actually be for Valentine's Day.  Now, it just looks Christmasy!  Of course, you could play off of the 'two calling birds' idea too!  Those little tendrils of color on the paper, that's from the stencil too!  Just some ink and a stipple brush will get you that look!
 
Oh and I have a secret about this card too.... I actually used YELLOW paste for this stencil.  YUP!  Not white but yellow!  If you look closer, you can see that the birds have a slight bit of yellow on their bodies, that's just the paste!  So, next time you are looking to paste with your stencils and you look at your stash, think OUTSIDE of the box! These stencils are extremely versatile and the pastes, they can be changed to suit your needs too!
 
Here are both cards, ready for Friday night's Dreamweaver Holiday Cards class at the Scrapbook Cupboard:


Now don't forget to go visit some of the other talented ladies blogs.  We have:


 And of course the Dreamweaver Stencils blog as well:  Dreamweaver Blog.


Thursday, December 2, 2010

Thursday's Dream Schemes!

It's Thursday and for everyone on the Dreamweaver Design Team, that means it's time to post a new photo for the Thursday Dream Schemes!  This week, I'm sharing a new stencil with you!    Dreamweaver is revealing two new stencils this month, LL3010 is a Heart Tole Wreath and LL3011 has Love Birds on a scroll wreath.

Here's the Brand New Stencil that I received from Dreamweaver, LL3010 the Heart Tole Wreath.


Also for the Dream Schemes this week we were given a sketch to follow for our cards.  Here's the sketch:

I love sketches.  They make life a little easier and they can be used in many different ways!  In my card, I chose to round out my corners and forgo the scrolls but I kept the ribbon and even the little bow (but in a different way!).  Oh and did I mention that we are making Holiday cards all month long?  Well, how about this for a Christmas card?


Do you see that Heart Tole Wreath?  Upside down?  Now making a HUGE Christmas tree!  The presents underneath are popped up.  They are just little presents stamped onto papers and cut out.  The star is a little sticker (you know the ones the kids bring home on their homework?) again popped up.   The heart tole wreath was pasted with pearlescent paste and F/X powders were added.   

WOW!  The versatility of these stencils are amazing!  I'm excited to show you what I created for next week!  This week's posting and next Thursday's postings will be the Dreamweaver class at the Scrapbook Cupboard on the 10th. 

Now hop on over to some of the other gals blogs and see what they made for their Dream Schemes!

Thursday, November 25, 2010

Happy Thanksgiving!

I've been really pre-occupied lately with the birth of my new niece, Gabriella.  I was my Sister's coach and helped her bring this sweet little girl into the world on November 18th.

Not only was I Mom's birth coach but I am also her Godmother!  I just love this little girl, she's already got quite a personality.  Gabriella is my third niece, and soon, I'll have a second nephew too!  My other Sister is expecting in January!  Lots of babies around!!

We found out just recently that my Grandmother is doing very well.  Her cancer has subsided and her outlook is extremely good! 

In my professional life, I found out on November 14th that the Scrapbook Cupboard was going to stay open!  She had announced that she was closing and I had already taken an interview and had scheduled another one.  What a stressful experience to go to job interviews.  I hadn't had to do one in years!  5 years actually and I thought I might have been a little rusty.  Well, no matter for now.  Bev has decided to keep  the store open!  Whew!  This will allow me to keep doing the classes I do, plus do all the behind the scenes administrative stuff that I love to do too!

Donna and I will still be working closely together and actually we met with a graphic designer this week.  I won't say more but that we are cooking up some good stuff!

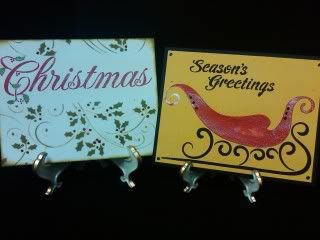
Today we are kicking off a Dreamy Thursday blog event with Dreamweaver Stencils! Every Thursday, the members of the Dreamweaver Dream Team will be showing some samples on their blogs.  I feel like I haven't been home more than an hour in the past two weeks.  So please forgive this week's submission, it's a repeat from one earlier this year.  Tomorrow will be my crafting day but that will be a day late for this.  Perhaps I'll post that tomorrow too!


With some black matte paste, I pasted the sign.  On some wood, I pasted the Season's Greetings and then cut it out to fit it on the sign.  The 'snowy' part on the bottom is just the Dreamweaver paste that's been piled on without any stencil.

Oh boy!  I know that it's not new but thankfully I have something to share today.  Come on back tomorrow, I'll post something then!  And next Thursday, come on back and I will be up to date on my crafting!

There's lots to be Thankful for this year!  Happy Thanksgiving to all!

Friday, November 5, 2010

Striking it out - on my own??

Well it has become official.  The store I am currently working with will be closing their doors.  I'm expecting the store to be closed before Thanksgiving.  Bummer, huh!  I've been with Bev and the Scrapbook Cupboard for 5 years!!  Yup!  5!  Seems like a long time but it's been some of the best times of my life.

So, what now?  Well I've got a ton of irons in the fire and hopefully one of them will pop back out at me and let me know it needs some attention. 

No, No, No, I don't really hope to get burned, I'm just so overwhelmed with the thoughts that are going through me.  I *almost* said I was never at the closing of a businesses doors but then I reflected that I used to belong to Corporate America and I was there when Nellie Mae was swallowed by Sallie Mae.  The difference between then and now - other than the awesome stock option package I was given with Sallie Mae?  Well, a lot.  A real lot!

I still have all those people to say good-bye to.  Co-workers, friends, customers... I still have to clean out my desk (cabinet space), I still have to find another job...

I'm very fortunate.  Very, very lucky.  When I was laid off with Nellie Mae, I had another job waiting for me.  I was 6 months pregnant with my first child and that was to be my new job.  It was a wonderful time, not having to worry about money (because I cashed in those stock options of course!) and just spending the time learning how to be a Mom.  Now, well I've got options out there too! 

Donna Maligno and I have teamed up to create KD Craft Concepts.  We will be striking out on our own, at least partially, to bring some of you regulars a taste of Donna and Kim classes and events.  In what capacity?  Unknown at this time.  We're still hashing everything out. I will also mention that, I've gotten a few other offers as well and will be exploring these very soon.  I'm hoping to find a new place to teach on a regular basis, we'll see how it all works out. - That's why the irons are in the fire, I need to get rid of some wrinkles and I need those irons HOT!  :-)

I'm sure you'll be seeing me posting more.  October was a miserable month... I was sick most of it.  And this month, we are awaiting a new arrival to the family!  My Sister will be having a baby girl soon.  So, whether photos of the new baby or photos of new classes and more information about where I will be, I'll be in touch!

Monday, October 4, 2010

Lucky number 16!

Guess what number was chosen through Random.org for my blog hop winner??  Lucky number 16... let's see who is #16.....

It's.....

Anonymous said...

Hey Kim,

Love the lace border! What a versatile stencil. I also love the glowing ghost. Leave it to you to have glow in the dark embossing powder. I also love F/X (all colors)

Diane H

Saturday, October 2, 2010 11:02:00 AM EDT
Diane H, if you are reading this, you've been chosen as my blog hop winner!  You have until Midnight on October 5th to contact Lynell with your mailing address and your choice.  lynell@dreamweaverstencils.com

Congratualtions to all the blog hop winners!!  Lynell will be posting some more winners later tonight.  And a special THANK YOU to all that participated in the blog hope, it was great to have all of you stop by!

Friday, October 1, 2010

Dreamweaver Stencils Blog Hop is here!

Welcome to the first ever Dreamweaver Stencils Dream Team Blog Hop!  Today is day one of this three day long blog hop.  There's lots to view over this weekend, a whole lot of eye candy using these quality metal stencils from Dreamweaver Stencils! Follow along, post a comment and you could be a winner! (details on blog hop are at the bottom of this post.)  Be sure to comment on this post for a chance to win!

All the gals on the Dream Team were given four stencils to work with for the blog hop.  These were mine:
Lets Boogie LM286

Long Stocking LL499


 Village LL459


Well now I'm hoping you are wondering what I did with them.  I used the lace border in a few different ways and coupled that with the the Village and with Let's Boogie.  First up, a little Halloween fun!


One of the coolest parts of this card is that it GLOWS in the DARK!  Well, the ghost, "Boo" and the little corner semi circles do anyhow!  Wanna know how I created it?
First I pasted on the ghost with Pearlescent Paste.  He's part of Let's Boogie and needed to be masked so that all I used on that stencil was the cute ghost. I also masked off parts of Boogie and pasted the word Boo at the bottom of the card. I then made sure the ghost and the word was dry completely.
After the ghost was dry, I fit on the Lace Border Stencil and used the original matte embossing paste.  Let that dry and then used the Picasso stencil to add color to the candy corns, dots and swirls.  In the lace border, there are these 6 pie pieces that make a circle, I left those white.  Well, I added googly eyes but not until after the entire thing was done!
Now, I own this glow in the dark embossing powder and thought it would be a cute touch to add that to the ghost.  Glow in the dark embossing powder works best over a light surface and the ghost was perfect for that!  I re-fit my ghost stencil back in place, used embossing ink and then sprinkled on some of the embossing powder.  I heat it slightly just until melted.  After doing that, this adorable little ghost now glows in the dark!
After the card was completely stenciled and pasted, I added the googly eyes last.

I was able to create something fun and then something elegant out of the same Lace Border stencil.  These stencils are truly versatile!  Use as much or as little of the stencil as you'd like to get the best results for your card or project!

My next card is for the Holidays.


This needed some masking as well.  I masked off one of the houses from the Village and then I used my Pearlescent paste to paste onto a heavy weight vellum paper.  Once the house was dry, I dug out my Pergamano kit and got to work!  I placed the Lace Border stencil strategically so the house fit in the middle and then either pushed the vellum into the stencil, pushed it out of the stencil or I used the pokey tool to poke holes into the vellum.  With the right tools and the right paper, this can easily be completely in about 45 minutes - and that allows drying time for the paste in a humid climate (I live in New England).
Mount the vellum onto a bright blue piece of paper and adorn the card as you'd like.  Easy!  Elegant!  And just shows another option of versatility of these stencils.

My last card today is with the stocking. 


More of a vintage type card.  I used pasted the stencil on red paper.  Again I used Pearlescent - hmmm.... I didn't realize until writing this that I used Pearlescent on everything.  With 15 different knds of pastes, my options are NOT limited so I guess I'm going to have to hide the Pearlescent so I stay away for the next few projects!
After the stocking was dry, I cut out right on the lines (or where the natural contour of the lines would be).  I placed the stencil back on, grabbed some glue and a paint brush and painted the glue onto the top part of the stocking.  I then threw on some flocking.  WHAT?  Flock on your stencil paste?  Yup!  Absolutely, these products are amazing!
I distress the background of the paper, added soem ribbon and old saying I had lying around and the stocking.  Viola - done!

But I'm not going to stop there!  I'm going to tell you about some classes I'm teaching in person and online!  If you want to know more about the amazing versatility of these stencils, you can come on by the Scrapbook Cupboard and take a class from me in person.  My next Dreamweaver Stencil class is on Friday, October 22nd.  We'll be creating two cards using several neat techniques...


What?  You don't live in New England?  Well, many of the other Dream Team members teach in their areas.  Or you can take my online class!


Class just started yesterday and will run for 4 weeks with new lessons posted every week.  You can view the class information here at My Creative Classroom. If you love all those beautiful metal stencil designs out there, you'll love the look of what they can do! Stenciling with Style will walk you through using DreamWeaver's Metal stencils, their pastes, F/X powders and the many different techniques to do with them! This class will is technique based so you will not need to have the same stencils as the instructor but you will be able to complete projects based on the stencils you do have! Class includes video presentations on exactly how to get pasting right every time as well as materials and instructions on basic pasting, dry embossing, theorem stenciling, using the 'picasso' stencil, working with other mediums such as Copic markers, inks and Art Stix, pasting on different mediums, coloring the pastes, adding texture to pastes, sludge pasting and much more!  Class starts on Thursday, September 30th with new material posted every Thursday for 4 weeks. Class cost is $25.


So now more information about the Blog Hop!

BLOG HOP INFO

We want you to have the chance to win YOUR favorite stencil, embossing paste and Metallic F/X color... for each time you post along the hop, you need to leave a comment on the site where the newest creation is offered, then go to the Dreamweaver site here http://www.dreamweaverstencils.com/, choose the stencil you like best, identify it to us, tell us why it's your favorite, and how you think you'd use it. Just be sure you comment on each blog along the hop..make sure your comments count for winning! Information today...then October 1st you hop!

BLOG CANDY... HOW TO GET IT!
For each time you comment on different blogs, you need to choose a different stencil as a favorite, your favorite paste and your favorite Metallic F/X color...just in case you win more than once! At the end of the three days,each member of the Dream Team will choose a random entry to win and post it on their site by midnight of the next day October 4.

ANOTHER OPPORTUNITY FOR CANDY
Hoppers are encouraged to comment once on each designer's blog throughout the blog hop. Each time you do so will give you one opportunity to win what's on offer at that blog. For an additional entry, you're invited to sign up to be followers of the Dream it Up Blog, right here. So, with eleven designers, this gives you the potential of twenty-two chances to win! All winners will be selected by Random.org, and posted on each designer's blog by midnight Monday.

BLOG HOP SCHEDULE
It is not imperative to follow this schedule, but different designers will be posting their creations on different days, so take one last look on Sunday to make sure you've taken advantage for all the opportunities to win blog candy ...now enjoy these designer's "treats", and here is their schedule:

OCT 1ST


OCT 2ND


OCT 3RD


Have fun hopping!

Thursday, September 30, 2010

Blog Hop Starts tomorrow!

BLOG HOP INFO


We want you to have the chance to win YOUR favorite stencil, embossing paste and Metallic F/X color... for each time you post along the hop, you need to leave a comment on the site where the newest creation is offered, then go to the Dreamweaver site here http://www.dreamweaverstencils.com/, choose the stencil you like best, identify it to us, tell us why it's your favorite, and how you think you'd use it. Just be sure you comment on each blog along the hop..make sure your comments count for winning! Information today...then October 1st you hop!


BLOG CANDY... HOW TO GET IT!

For each time you comment on different blogs, you need to choose a different stencil as a favorite, your favorite paste and your favorite Metallic F/X color...just in case you win more than once! At the end of the three days,each member of the Dream Team will choose a random entry to win and post it on their site by midnight of the next day October 4.

ANOTHER OPPORTUNITY FOR CANDY

Hoppers are encouraged to comment once on each designer's blog throughout the blog hop. Each time you do so will give you one opportunity to win what's on offer at that blog. For an additional entry, you're invited to sign up to be followers of the Dream it Up Blog, right here. So, with eleven designers, this gives you the potential of twenty-two chances to win! All winners will be selected by Random.org, and posted on each designer's blog by midnight Monday.


BLOG HOP SCHEDULE

It is not imperative to follow this schedule, but different designers will be posting their creations on different days, so take one last look on Sunday to make sure you've taken advantage for all the opportunities to win blog candy ...now enjoy these designer's "treats", and here is their schedule:

OCT 1ST


OCT 2ND


OCT 3RD


Saturday, September 25, 2010

Being a better instructor...

I'm looking for something...

It has occurred to me in the last few classes that I taught that I need a slight refresher course on being a good instructor.  But where would you find such a course?  If one existed, wouldn't everyone want to take it?  Now, I'm not a lousy teacher (I hope!) but lately, I've felt disconnected while teaching (this is 'in person' teaching, by the way) and I want to be better.  It's not that my students don't learn - they do!  And it's not that they don't finish the projects - they do!  And really, I'm not even sure if any of my students notice but I just feel like I want to be better.  I want to be more connected to the people that take my classes, to help them more, understand and anticipate their needs and wants.

Is this possible? 

Today, I went on a virtual journey.  Looking for a class, a Ning, anything that might help those of us that teach crafts to adults.  It occurred to me, as I was looking, that perhaps this type of class (whether in person or online) doesn't exist.  I DID find a description for a craft instructor.  Look at the credentials for a craft instructor here:  Craft Instructor  I love it when they describe a craft instructor as:

Craft instructors are important to us, as they bring art and creativity to the public. They help even the most unskilled artist create beauty and power through artistic endeavors.

How true that is.

Now, when I say that I'm looking for a class to refresh me on these skills.  This is what I mean:

Craft instructors must be patient, kind and understanding of others' abilities and talents. They should have a sound knowledge of many aspects of crafting, and be extremely skilled in the area they teach. They should have leadership skills as well as very good communication skills. Craft instructors must be open to many types of people, cultures and backgrounds, and should be able to treat everyone equally. They should be fair, kind and enjoy people. If they choose to go into business for themselves, they should have some knowledge about business practices.

This is so right.  It hits right on what all craft instructors should be.  This is what I want to brush up on.  I believe that I'm patient, kind and understanding.  I have a sound knowledge of the crafts that I teach and many times I'm more than qualified to teach a skill.  It's the next sentence I would like to work on.  My leadership and my communication skills.  The rest of the paragraph, I've got too!

I do think that I can be a good leader.  Heck, sometimes I feel like the darned Pied Piper! But I just want to brush up on the leadership skills.  Or maybe, I need to be humbled.  I need to know what I'm doing but not act like I do. 

No, that's not it. 

I need to know what I'm doing, be able to teach it and make the people I'm teaching feel like the only person in class - like they are getting a private lesson. 

Is that possible?  Is that what people want??  It's really been such a long time since I've been a student in a class.  Perhaps that's my problem.  I need to be a student more often.  I need to sign up for a class that is WAAAAAAYYYY out of my element so that I can get a better understanding of what others want.  Should I?  What to take?  and where?

Then there's my communication skills.  Yes, I admit.  These have been shot lately.  I can't seem to wrap my mind around anything I want to say lately.  And I'm seriously wondering if this blog post even makes sense!  :-) I find that I'm struggling to come up with words that should very easily roll off my tongue.  Words like "adhesive", "stamp", "brush".  Several times in the last few classes, I've described what it is they need to use rather than just saying the word.  Because the words trips as it's falling off my tongue.  Ever been in class and a teacher has said, "So now stick that piece of paper to the other, using that sticky stuff that comes out of the little hand held container." 

OK, yah I might not have said exactly that but something similar - and a few times too!  How terribly embarassing.  What's going on that I can't connect the object to the word?  I will say that I do find that I trip on words while not teaching too.  Almost like my brain is spinning so fast, my vocal cords and tongue can't grasp what's being said and just stops working.  Very similar to a car sputtering awake on a cold, New England Winter morning. 

Blah....  Blah, blah..... bl....ah...bla...h. blah, blah, blah, bla......h, bl....ah, Blah, blah, blah, etc. 

Say that out loud and you'll have what I sound like... sometimes.  I do not have the knack of listening/comprehending and talking all at the same time.  I know someone who does but that's not me. 

So, if any of you out there in blog land stumble across a class that might make me a better instructor, I'm looking to brush up on my skills.  Sure, I may not learn much (or anything) but then again, I just might.  And I'm all about trying to better myself and hone my skills. 

It's all for the greater good.  I refresh my skills and you get a better instructor!

Thursday, September 23, 2010

Classes this Fall... well through October anyhow...

Loads of online and in person classes are being set up for this Fall!

Online through My Creative Classroom, I'm offering right now Art Journals, Handbound... sign ups are only through September 24th.  Class has already started (but only one week, so you still have time to sign up if you'd like).  This class will run for 4 weeks and is only $20!  View the class information here.


Starting this week is the Metal Sampler.  If you've seen my blog before, you've seen this posted several times.  You will learn about 14 different metal embossing techniques in class.  This class starts on Friday, September 24th and will run for 3 weeks.  This class is $25.  View the class information here.


The last week of September, I'm starting a NEW class!  Stenciling with Style!  This class will cover all different types of paste embossing, stenciling and much more!  In this four week class, we'll cover about 20 techniques that you can do with all those beautiful Dreamweaver stencils!  This class is $25 and starts on Thursday, September 30th.  View the class information here.


On Monday, October 11th I will be starting the second bookmaking class.  MORE Art Journals, Handbound.  This class will run for 4 weeks and we'll be covering even more bindings as well as techniques for the inside pages.  Lots of FUN!  View the class information here.


Advanced Metal Techniques will be the last class I have on My Creative Classroom's calendar for this semester.  This class starts on October 28th.  This four week class will go into even more metal embossing techniques as well as putting together many different projects.    Class is $25.  View the class information here.


I have another class I wanted to put online but as of right now, I haven't too much time.  While I'd love to get another class out there typing up those directions takes time plus presentations and videos (if needed).  So stay tuned to see if I got to that one.

In person, I have a number of classes for September, October and we are already starting to schedule November.  While I don't have any samples for November, I definitely have one for this upcoming Friday...


Holiday 'scapes will be on Friday, September 24th from 7-9PM at the Scrapbook Cupboard.  Using just a few Stampscapes Stamps, ink and the right paper and you can create easy Holiday cards in a flash!  Class is $20 and includes everything you need to complete the above two cards.

On Sunday, September 26th you'll find me at the Scrapbook Cupboard again hosting the first Collage Workshop.  While this isn't a class where I teach you how to do the Collaging, I will be doing a demo during class using some different products in the store.  Class is from 12-3 (or 4, I'm not going to kick you out) and is $20.

Tuesday, September 28th, I'll be back at the Scrapbook Cupboard again for the Card Swap.  This month's theme is either Fall or Halloween cards.   This swap is already full but next month's will interest everyone.  We are making cards to send to our servicemen and women overseas.  These are cards that they can then use to send back to their families.  There is no need to sign up for this class, just drop off your cards before October 28th to have them included.  Absolutely no glitter or sparkly material on the cards.  For more information on it, see the date October 28th on the Scrapbook Cupboard's online calendar.

My first class in October at the Scrapbook Cupboard is on Thursday the 7th.  I don't have any samples for the Collage Cards for that night.  I'm awaiting a Penny Black delivery to the Cupboard so I can use those stamps.  I might try to squeeze in another from the Artful Stamper but so far, I don't have anything to show you for that.

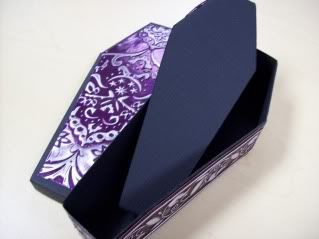
Friday, October 8th I'll be back at the Cupboard for my Spooky Coffin and Mini book...


Inside this spooky little coffin box contains a hand bound mini album. This is perfect for those scary Halloween pictures or just to display! With a little metal on the cover and stitches on the inside, it's sure to be a ghoulishly fun class!  Class is $20.


For the rest of October I have:

Copic Theory on Thursday, October 14th - $20
Circle Journal Swap/Crop on Saturday, October 16th - $10
Copic Review for Beginners on Sunday, October 17th - $59, includes 6 markers
ATC Swap on Wednesday, October 20th - $5 - out theme this time around is {Alice in} Wonderland
Another Collage Workshop on Sunday, October 24th - $20
The Card Swap (see above) on the 26th - Free

and

Happy Holidays with Dreamweaver on Friday, October 22nd. 


Get a jump start on your Holiday cards using some tips and tricks from our own Dreamweaver Design Team Member, Kim! We'll be completing two Holiday cards using some unique techniques.  Class is $20.

I just am now realizing how much I have going on in the next month.  I'm tired just writing this post, nevermind actually doing it. This is just classes too.  Well, if you find me dead come Halloween, you'll know why!

As I get to complete the samples for some of those classes above, I'll post them here and on the Scrapbook Cupboard's website.

Wednesday, September 22, 2010

Creating this Fall...

For a craft teacher, Fall is the busiest season.  Or, well, it is for me!  When Fall pops up, I find myself crazy busy with all sorts of different classes both in person and online.  But it's not just the classes that bring chaos to my life, it's the creating and keeping them all straight!

A few months ago, my friend Susan, bought me a 'Projects Notebook'.  It's set up so that you can list the things you need for each project and then refer back to them easily.  I tried to use the notebook and I think the set up is great, I just need it bigger and well, I need someone else to write it for me!!  I'm just not that type of crafter.  Although, I must say... when I do write directions (all my Copic in person classes come with directions as well as all my online classes have printable and downloadable PDF files)  I spend a good deal of time making sure they are accurate and step by step.  I have used the notebook on occasion to write something in it so that I remember to type it up later, so it's not all a waste.  And someday, I'm going to type the format of the notebook into a Word document so that I can use it more often. 

Anyhow, one of my biggest problems is how long it takes me to actually create.  First, it's finding the stuff.  Yes, I have everything organized but no, it's never clean!  And then the creative process.  For me, it takes a while to get started.  Like a cold car on a winter morning, it takes a little bit of time to warm up.  But once it's running, I can swoop down and run like the wind. 

OK, that is until the wind hits a brick wall - usually the brick wall is anyone or anything that interrupts me.  And when I say anyone or anything, I mean it.  I've got two sister's expecting their first babies in the next couple of months, so they have been known to pop by for a visit.  I have a Mom who works here in town and she's been known to stop by unexpectedly (well, sometimes she texts first but I swear sometimes she texts from my driveway!) and always visits on Friday's - most of the day.  I have my Weight Watcher's meetings, my Zumba classes (which I LOVE!), Thursday's belong to my hubby since he is usually home all day.  Monday morning's I signed up to volunteer for Caleb's classroom library time at school.  I LOVE to volunteer, it's so rewarding plus seeing my kids at school interacting with their friends, I just love the experience...  And the 90 minutes flies by.  All that plus whatever else happens leaves very little time to actually create.  Which frustrates, saddens and sometimes angers me.  I love to do it but I just can't seem to get to it.  Just like any other crafting Mom out there, it's tough to fit it into your schedule between laundry, dishes, homework, after school activities (my boys are currently just in scouts), keeping house, paying bills, groceries and whatever else needs doing.  No wonder I'm tired!

Over the next few months, I'll be planning two baby showers, hosting several Tastefully Simple parties and events (did I mention that I'm a consultant for them too? Yup, and this Fall's catalog is fabulous.  People are loving all the goodies they came out with this year!), teaching at the Scrapbook Cupboard, teaching online through MCC, being my Sister's birthing coach and so many more things I just can't wrap my head around it all.

Tomorrow, I'm going to post my upcoming classes.  I've got quite a few on the books and want to make sure everyone gets a chance to see!

Tuesday, September 21, 2010

Blog Hop coming soon!

The 10 designers of the Dreamweaver Dream Team are working to put together a blog hop for YOU! 

http://www.dreamweaverstencils.blogspot.com/

You'll want to watch the above link and be sure to come back to this blog on September 30th!  Here's a tiny sneak peek of what I've been working on....


Hey, I said it was tiny!

Wednesday, September 15, 2010

Lots of Pasted Cards!

Last month, the Dreamweaver design team was asked to create some Holiday inspired cards using the Dreamweaver Pastes and Stencils. These are some of the designs I provided...


I had a lot of fun making these cards!   Some of these cards will be taught in some upcoming classes too!  You'll see several of the cards taugh at both the Scrapbook Cupboard in East Bridgewater, MA as well as online with My Creative Classroom.  My Dreamweaver online class starts Thursday, September 30th.  Lots of techniques in class to learn, including videos, presentations and hand outs!

Coming up soon - a Dreamweaver design team blog hop!  More details coming soon!

Tuesday, August 31, 2010

Back online and feeling fine!

My new PC is here!!  And without a moment to spare!  I have lots to catch up on.  While working from the library was ok, you really can't do much about the photos.  The library PC's are just not right for uploading your photos. 

While gone, I've made some Dreamweaver holiday samples and worked on some Copic, Stampscapes, my new MCC classes and more!  The kiddos go back to school tomorrow, so I can be assurred now that everything will start to get done!  That includes blogging!

I've got a few classes coming up that I'd like to share!  First on Friday, September 10th at the Scrapbook Cupboard, I'll be teaching this class...


There are many different easy to do Metal techniques in this.  Obviously lots with the Cuttlebug but some hand embossed stuff too!  While I love to work with metal, it's not always workable into the schedule.  This was supposed to be a class in July, and then in August, but I really slacked off this Summer and didn't have it up in enough time for people to sign up.  On the day it was supposed to run in August 4 people called to sign up.  After the other 2 people who signed up were called and told it was cancelled.  Oh, {*sigh*} well I have no one to blame - so I'll blame the call of the pool...  :-)

The following day, I'm headed up to Ink About It in Westford, MA for two metal classes.  One is the tag book I created a few years back.  It's filled with lots of different basic metal embossing techniques...


This class is in the morning.  Then in the afternoon, I'm doing a card class.  It's a great way to see how you can incorporate the techniques you learned into something else - other than tags...


This is the Faux Tin Litho technique.  It can be done with ANY stamp, not just this one.  This just happened to be a holiday stamp I grabbed.  Then there is this one...

Ok, you are going to have to turn your head to view.  I see now that I haven't finished installing all the software into my new PC and I have not editing software to turn this.  The next one too.

Not as Holiday-ish as the others but put on a little saying that says "Happy Whoolidays" and you'll be fine!

I'm looking forward to teach those two classes.  And boy, oh boy and I ready to get back into a routine!

I have lots more to share but think it best to load that software first.  I'm going to do that now.  But he's a video I shot and then edited for Just Imagine Crafts.  The owner, Bobbie is a wonderful woman!  She's here in MA for the Summer and Bev and I were happy to do this on the little Flip camera my husband owns!  I'm so happy with that little camera, I bought a HD one for me!!  It'll be here soon!  The Flip comes with it's own software, so I was able to edit that right away!  Here's a link to the video...


OK, now I'm really feeling uncomputer savvy.  I KNOW I can put the video into the blog but I can't figure it out.  It must be the incessant "MOM, MOM, help me with...."  I'm hearing.  Only one more sleep until school starts!!!

Monday, August 16, 2010

Gone Viral...

I have some projects to blog about but right now, I'm still fighting a virus.  Not me, personally but my poor little PC. I finally was able to install a good virus software (I had Trend) but it wasn't catching everything (Spyware Doctor), there was definitely still something going on inside.  So while at Bella Art teaching the other day, hubby installed McAfee.  It appears to have scrubbed most of the virus away but I'm still left with just this tiny problem....

When I do a google search for anything, and I click on one of the links it gives me, it doesn't always send me to where it was supposed to send me too.  UGH.

At first I thought maybe it was Internet Explorer's problem.  An Aunt suggested I download Chrome (which I must say, I really like!) but it still does it with Chrome.  BUT!  Here's the strange part... it only does it when I search through the Chrome address bar.  If I click on HOME and then do a search through Google, no problems.  So.... that's what I've been fighting with lately.

If anyone out there has any suggestions, I'd love to know.  Otherwise, I think I'm going to live with what I've got and get going with all my many projects....

more tomorrow (as long as my PC stays stable).

Sunday, August 1, 2010

More Art...

As promised, here are some more of the art I've been working on lately.

I couldn't believe that after I made this post last night, I was so wide awake thinking of different ways to do some of the upcoming projects I have due.  Now to write them down so I don't loose the ideas...

Here's the Home Decor Collage Piece that I'm teaching at the Scrapbook Cupboard on the 13th...


It's all about the waxy gooness on this one.  YUM!

Then I created some cards for a class at the Scrapbook Cupboard called, It's All About the Metal...


I LOVE me some metal!  And this goes just a bit further than you might think!  All sorts of metal in this... :-)

I also made a card for the Card Swap I host once a month.  Well, I made 8 of these for the Card Swap and this is the one I came home with.  Have you seen this Cuttlebug folder before?  Yup, how simple was THAT!


OK, I say it was easy but really - they took some time to intricately paint each of those lines without going over too much.  It's all part of the art process, though!  I was happy to do it.  As for the saying,  I own a stamp set with a bunch of different birds on it with some cute sayings, the "What's the Word, Bird." saying was in that. 

I'm off to have lunch with the in-laws today and then hopefully come home to create more art.  I'm really feeling it today and kinda bummed I have plans...  Oh well. 

Some art to share...

I finally have a moment to post some artwork that I have to share with you!  Wanna see?

First, here are my CHA -Summer Dreamweaver Samples:

This is a new stencil for me.  It's number LG 679.  Before I even put the stencil to the paper, I used my Copic airbrush system to airbrush the back ground.  A light speckled blue background was all I was looking for.   Then I used the original Dreamweaver Stencil paste to paste on the scenery.  After I let that dry COMPLETELY, I then used my Copic markers to color each of the individual parts.  I do this with a steady hand right on top of the dry paste.  Don't bother putting the stencil back over the design, if you are too heavy with your hand, you just might accidentally over color the area and bleed the color to the paper.  It's important that the color just stays right on top of the original Dreamweaver Paste.  That's the one with the Maroon label.  :-)

This is the BRAND NEW CHA Summer design!!  It's LJ 902.  I made about 10 different samples using this stencil as I just loved playing with it.  All but this one made it to the round file.  (I can be picky with my art if it doesn't come out right!)  I used the Yellow embossing paste on white watercolor paper.  Watercolor paper is kinda lumpy bumpy, so it adds a nice texture.  Once the yellow paste was dry, I placed the stencil back on top of the design and then used my picasso stencil (that'sll 332) to color in the leaves and stems green.  For the green, I used the oil based Art Stix and a small stencil brush.  The center of each of the daisy flowers has black flowersoft.  It's the fine flowersoft so it's not too chunky.  
Now, if you click on the photo, you might notice that some of it looks shiny.  That's because I didn't realize how long the art stix were going to take to dry.  Hours after I put it on, it still was wet.  So, I threw down some green glitter on it, and it stuck!  I was actually quite happy with the green glitter look once finished. 

Ohhh... this is one of the new Summer releases!  Wheat!  It's item number LL 3008.  This is on Ten Seconds Studios Dark Chocolate Brown metal.  It's actually a really cool process.
First, you need to own a paper stump.  Place your stencil down onto a mouse pad.  Place the metal down on top of the stencil with the color face down.  Use the paper stump to rub over the stencil area, revealing the design.  You'll notice in my design that it's on their three times.  ONLY do the stencil rubbing on the metal twice!  Use your paper stump to really get into the areas of the stencil.
Flip the stencil over and use a sanding block (emery board or other type of sandpaper) to sand off just the raised areas of the design.  Try very hard NOT to hit the other areas.  You might want to push the other areas flat with your paper stump first.
Once you've sanded the areas, use your paper stump to completely flatten the entire piece of metal.  YES!  I said FLATTEN the piece of metal.  You'll notice that because you already sanded it, the images are still there!  Now you can use the stencil on the front of the metal.  Attach it on with repositionable tape and then use the Metallic Silver Paste to paste on a Wheat stalk in the middle of the two that are sanded.  Let that dry completely.  After it's dry, place your stencil back on to the pasted design and use alcohol inks and an applicator to add a little bit of color to the metallic paste.
Lastly, I used just a wheel from Merc Art to add a little bit of texture around the edges.  Sanded those and viola!  Done!
OK, I know this was a LOT!  Let me know if you'd like a step by step tutorial with photos and I'll do it!  But you gotta let me know you want it!

Oh, this is one of my FAVORITES!!!  I'm so gonna repeat this in a class soon!  This is the sign stencil number LG 684. As well as the itty bitty Season's Greetings, number LS 91. 
I love this one!!
It's all done on blue cardstock.  First, use a white pigment ink to add a little bit of texture to the background.  Then I used black matte embossing paste on the sign stencil.  While that was drying, I measured the inside of the sign and cut a small piece of the wood paper from Creative Imaginations and used the Season's Greetings stencil and Glossy white paste to stencil in the middle of the wood paper.  I let all that dry.
After it was dry, I placed the sign stencil back on and added a little bit of the palette glue and the NEW Metallic F/X Mica Powder Gold Dust to parts of the sign.  I also put the stencil back ontot the Season's Greetings design and colored the words with red oil based Art Paint Stix.  After adhereing the sign into the middle of the cut out area of the signpost, I then used glossy dreamweaver paste - as is! - to add a little bit of snow to to the bottom of the scenery.  Now, I thought I was done with this after I did that and I needed to run an errand.  Well, while driving, I realized that I needed to add just ONE more element to this card.  I NEEDED a little sparkle!  So, before the white glossy Dreamweaver paste dried, I embedded just a tiny amount of white glitter.  Just to add that snowy sparkle!


The NEW Peacock!  My friend, Mimi's favorite stencil.  She was with me when I started using this stencil.  She accidentally saw it before she was supposed to.  Oops.  She promised NOT to say anything but as soon as they the design was released to the public, she told Bev (the owner of the store I work at) that she was on the list for when they came in.  I'm happy to say, that I KNOW that Miss Mimi is a proud owner of this beautiful stencil!  I bet you are wondering what number this stencil is - so you can order your own!  It's LG 730.  Get it, now!! It's simply gorgeous!  Have you seen the other samples the other gals on the Dream Team have done with it.  SO much!!!  Go look!  Their blogs on on the right -------> over there------> go look!
This was my sample on the Dreamweaver blog.  YAH!  I love it!  Go take a peek!

Whew!

So, I've been a little busy.

Not only have I created those wonderful samples for CHA but I've also got a few samples of classes at the Scrapbook Cupboard too! I was going to show them here tonight but the photos appear to still be on my phone.  I'll grab them and get them up for tomorrow.  I promise!

School's out ...for Summer?

Last night the Governor of Massachusetts cancelled all school until May 4th.  He did this on March 25th.  That is about 6 weeks of no sc...