Happy New Year!!
May your 2010 be wonderful, prosperous, healthy, crafty, enlightening and FUN!!
My New Year's Resolution this year is to blog more. I always want to and I have so much to show, share and say so... in the new year of the newest decade, I plan to show you more, share more and say more!
Please be safe tonight and enjoy your festivities!
My husband isn't home from work and may not be until almost 8 but the kids and I are playing Wii, crafting and I'm just about to put a chicken into the rotissourie (ok, I KNOW that's spelled wrong!)
See you all next year!
Thursday, December 31, 2009
Tuesday, December 15, 2009
Life Now....
It's been a while since I've blogged here about my family, my life and me. So I thought I'd catch everyone up.
The kids are in school and I volunteer twice a week at the school. It keeps me in their lives while at school too. I really love the opportunity. Both boys brought home their report cards the other day. Caleb got all A's and B's (except they don't call them B's anymore - now they are P's. I do not know what the P stands for.) and Bryce receive all Satisfactory or Outstandings (in K through 2nd they only do Satisfatory, Outstanding, Needs Improvement, etc. No A's or B's in those grades either). Bryce's teachers note made mention to him being a little of a mess maker. OK, it made mention that he's a big mess maker. But it's so hard for me to tell him to clean up his act when I'm exactly the same way!! Yikes! Both boys are in cub scouts and love it. Patrick's even a den leader for Bryce's den. So we are all about the scouts here. Well, sometimes.
I've been sticking with the Weight Watchers plan and have lost a total of 21.2 pounds since September! I do keep a blog on my Weight loss, giving me something to look back on in the future. It's been a fun road so far. Not too hard yet. Well, it was very hard at first but now it's kinda smooth sailing. I don't always loose a lot, and one week I gained! But I jump back on and work at it. It'll be a while before I'm at goal but I know it'll be worth it.
Christmas shopping is in full swing here (and I'm sure almost everywhere!), the boys are done being shopped for. YES! And I just finished my husband this morning. YAHOO! But I have several family members to get gifts for. Some are easier than others. It seems that all my swap partners this year are guys, so I'm not going to be making any gifts this year. Oh well. Speaking of making things... I have my Christmas cards in pieces. I think I'll work on those today. Almost everything is ready for them, it's just assembly time. Which can take a whole day!
Life continues to spin crazy. I'm creating classes and have almost all of my January class samples done. I'm working on my Copic classes today. I'll take some photos and post those later this week.
A very Merry Christmas to everyone and I hope everyone has a WONDERFUL and PROSPEROUS 2010!
Wednesday, December 9, 2009
Zen - tangled!
Today was the ATC Swap at the Scrapbook Cupboard. The theme this month was Zentangles or Doodling. I read all the online literature I could find and I came up with 10 completely diffferent ATC cards. While I didn't find the theme to be difficult, I did find it time consuming. I had a tough time doing more than one card at a sitting - my eyes going 'tangled'. One of the days I was working on my cards, Bryce came in to see what I was doing. He's only 6 1/2 but he can tangle with the best of them! Take a peek at what Bryce did...
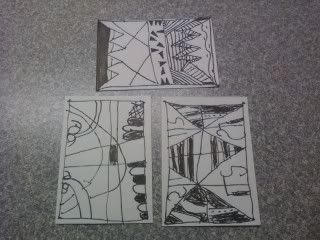
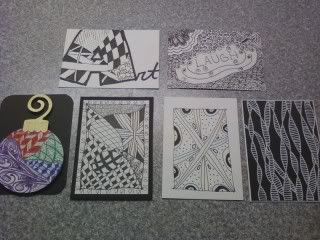
Aren't those cute!
We are missing a few from some other participants, but so far, these are the fabulous cards everyone has made...
And not a one of us has had an actual class with a Zentangle teacher!
Our next ATC swap with be Wednesday, February 10th and our next theme is Nursery Rhymes and Fairy Tales. I can't wait to see what these talented ladies come up with!
Sunday, December 6, 2009
Holiday Card Keeper - Part 4
This is is, the last of the series on the Card Keeper. I hope you have all enjoyed it!
Today we are going to finish it up and attach our metal to our box. Here goes...
Day Four
Supply List:
Box with lid – I’m using a cigar box, it measures 8 ¼ x 7 ¾ x 3, any paper Mache box will work too.
Paints with Brushes, I’m using the new Claudine Paints by Ranger but any acrylic paints will do.
Some paper towels or a soft cloth for buffing.
Sand Paper or Sanding Block
Your nearly finished piece of metal
Paper Stump
Brass Brush
Humungo Adhesive

To color the metal, I dipped my brush into the paint and painted over some of the areas I wanted colored. Ranger's Studio paints stick really well into the metal so you don’t need to let them dry too much before buffing.

With cotton cloth or some paper towels, buff off some of the paint. I do this just so I can see some of the metal underneath.

As you see here, I completely covered the back piece in blue (I mixed the white and blue to get this nice color) I also completely covered the bottom in white.

I just buffed off the paint so that the paint ‘stuck’ into the snowflakes but didn’t stay all over the project. If you are using a cheaper paint, just let the paint dry a few moments before buffing. If you don’t then you might find yourself wiping all the paint off the project. If that happens, just do it again!

I found that some areas had paint left on that I didn’t want there. I used my brass brush and in a circular motion, ‘brushed’ off the paint.

To add my metal to my box, I use the Humungo adhesive from Ten Seconds Studio. There are many options out there. You can use a strong liquid adhesive as well as any strong dry adhesive. I’ve used the Ultimate, Claudine’s Multi Medium, Uhu’s Twist and Glue, Kokoyo’s tape roller, Magic Scraps adhesive and some others.

If you use the Humungo adhesive, my suggestion is to cut it to size first and then peel back just one layer.

“Walk” the adhesive down your piece. Basically, start at one end and then slowly spread you hand over the piece until all the adhesive is down. You’re trying to ensure no air bubbles get trapped between your adhesive and metal.

It’s possible you might have to trim up some of your adhesive.

Once you find the correct placement on your piece, then peel back the other layer on the adhesive and ‘walk’ it onto your box.

Use your paper stump or popsicle stick to help the sides lay flat on your project.

And now you’re done!
I hope you enjoyed this blog class! If you have any question, please let me know!
Today we are going to finish it up and attach our metal to our box. Here goes...
Day Four
Supply List:
Box with lid – I’m using a cigar box, it measures 8 ¼ x 7 ¾ x 3, any paper Mache box will work too.
Paints with Brushes, I’m using the new Claudine Paints by Ranger but any acrylic paints will do.
Some paper towels or a soft cloth for buffing.
Sand Paper or Sanding Block
Your nearly finished piece of metal
Paper Stump
Brass Brush
Humungo Adhesive

To color the metal, I dipped my brush into the paint and painted over some of the areas I wanted colored. Ranger's Studio paints stick really well into the metal so you don’t need to let them dry too much before buffing.


I hope you enjoyed this blog class! If you have any question, please let me know!
Saturday, December 5, 2009
Holiday Card Keeper - Part 3
I hope you are having fun! I would love to hear from you or see what you are doing if you work on this project!
Day 3
Day Three
We are going to continue our metal embossing today. Today is going to be a tough day. Depending on how much you stamp, there could be a lot of tracing and refining. If you need to, take breaks. Your wrists and hands will thank you for it.
For today, you’ll need to dig out…
REMEMBER! When stamping on metal, use only a hard surface under your metal.

Choose the placement of your stamps and on the back of the metal, with just the acrylic (smooth cutting mat) underneath your metal, stamp your images. I used Staz On ink for this.

Complete your design. If you make a mistake or decide that you put in one too many trees or snowflakes, no worries! You can either ignore it or you can ‘erase it’ with a little blending solution or rubbing alcohol on a paper towel. Remember this is all done on the BACK of the metal. You won’t see this part in the end.

On the thin mat (mouse pad) with the refiner (ball point pen), place the waxed paper over the stamped on metal (this is optional) and trace the stamped lines. Be careful with close lines; remember you don’t want to ‘blur’ the lines. If you can leave out some lines on your image and keep the basic design, I would recommend for your first try. You can always add more detail in later if needed.

Once you have completely traced all of the stamped images, flip over your metal and place on just the acrylic mat (smooth cutting mat) and refine all your edges. This might take a while. Be patient!

If you have some areas that have a lot of details, such as the trees in the above photo, consider just tracing the outside lines. The when you are on the front of the metal refining, add in some squiggly lines. The lines will be slightly debossed in to the metal, but it’ll add a little bit of texture to your design.

On the acrylic mat (smooth cutting mat), take your paper stump (or popsicle stick) and on the front of the metal flatten any areas that are slightly puffy. You’ll add some dimension to just the area you want after this step.

On the back of the metal, place a thin mat (mouse pad) under the metal and select a few areas to ‘puff’ the metal. You’re just going to rub over a small area and stretch the metal outward.

Above is a photo of the ‘puffed’ area. You can see it’s slightly raised from the other metal surrounding it.

Let’s add a little bit more detail to your work. If you own a wheel tool, run the tool over the metal with the thin mat (mouse pad) under the metal. I did this on the front side of the metal. In my design, I only ran the wheel on the bottom – to look like a road, but feel free to use as you need for your own design.
Now we need to protect our embossed design from being flattened by normal use.

I use a cheap Lightweight Spackle and an old gift card.

It might take a little bit of scraping but slather on your spackle and then scrape off any extra. It's easiest to remove any spackle that's onyour gift card before cleaning up the metal. Spackle likes to attach itself to itself so if your gift card is scraped it will work better.
When you are done, you should see mostly metal but you need to make sure that the puffed areas are mostly filled in. The piece above is still not completely done. You should make sure that any excess spackle is removed - even if you use your fingers to do it. The better your spackling job on the back, the better the finished piece will look!
Let the spackle dry completely. Tomorrow we will finish up with some painting!
Day 3
Day Three
- Your aluminum piece from yesterday.
- Stamps, any of your favorite images will work. Don’t use ones with words for your first design.
- Staz On or Archival Ink, any color is fine although a dark color is best.
- Paper Stump - or popsicle stick
- Refiner tool – or empty ball point pen
- Ball and Cup tool – or medium sized stylus
- Thin Mat - or mouse pad
- Acrylic Mat - or glass cutting mat
- Small Wheel Tool – I use the ones by Ten Seconds Studio but Merc Art makes some and there are even some that quilters use. This past Halloween we bought a pumpkin carving set and it had a wheel tool in it that will work too!
- Lightweight Spackle
Choose your stamp set and let’s start inking…


On the thin mat (mouse pad) with the refiner (ball point pen), place the waxed paper over the stamped on metal (this is optional) and trace the stamped lines. Be careful with close lines; remember you don’t want to ‘blur’ the lines. If you can leave out some lines on your image and keep the basic design, I would recommend for your first try. You can always add more detail in later if needed.


Now we need to protect our embossed design from being flattened by normal use.


When you are done, you should see mostly metal but you need to make sure that the puffed areas are mostly filled in. The piece above is still not completely done. You should make sure that any excess spackle is removed - even if you use your fingers to do it. The better your spackling job on the back, the better the finished piece will look!
Let the spackle dry completely. Tomorrow we will finish up with some painting!
Friday, December 4, 2009
Holiday Card Keeper - Part 2
Thanks for coming back!
Here's day two of the Holiday Card Keeper:
Today we are going to get started on our metal embossing! For today, you’ll need to dig out…
Your aluminum metal. This can be a piece of 36-40 gauge metal from Amaco, Merc Art, Ten Seconds Studio or you can even use a disposable top to an aluminum party pan.
Tracing paper or words printed backwards.
Paper Stump - or popsicle stick
Refiner tool – or empty ball point pen
Ball and Cup tool – or medium sized stylus
Thin Mat - or mouse pad
Acrylic Mat - or glass cutting mat
Here’s a few photos for reference…


Here's day two of the Holiday Card Keeper:
Today we are going to get started on our metal embossing! For today, you’ll need to dig out…
Your aluminum metal. This can be a piece of 36-40 gauge metal from Amaco, Merc Art, Ten Seconds Studio or you can even use a disposable top to an aluminum party pan.
Tracing paper or words printed backwards.
Paper Stump - or popsicle stick
Ball and Cup tool – or medium sized stylus
Thin Mat - or mouse pad
Acrylic Mat - or glass cutting mat
Here’s a few photos for reference…


Thursday, December 3, 2009
Holiday Card Keeper - Part 1
Welcome Back!
Today I'm starting a three part/day blog post. I'm hosting a FREE blog presentation on how to make a Holiday Card Keeper. You can view the Supply List for what you'll need the next three days here.
If you have any questions, post them as a comment and I'll answer them in another post for everyone to see.
Enjoy!


*Not pictured, I painted the top lid of the box the same Modern red and I added Holiday papers to the bottom outside edge. I adhered the paper with the Multi Medium and I then added a thin layer of multi medium over the paper too.

I used one of the left over cedar planks to keep propped open. I left this to dry overnight.
Tomorrow, we’ll emboss our metal. I used a piece of aluminum metal that just fit the top of my cigar box…

That’s a cutting mat, a disposable aluminum pan cover, a mouse pad, several stylus’ and an empty ball point pen.
Today I'm starting a three part/day blog post. I'm hosting a FREE blog presentation on how to make a Holiday Card Keeper. You can view the Supply List for what you'll need the next three days here.
If you have any questions, post them as a comment and I'll answer them in another post for everyone to see.
Enjoy!

Supply List for today: **
- Box with lid – I’m using a cigar box, it measures 8 ¼ x 7 ¾ x 3, any paper Mache box will work too.
- Holiday papers
- Gel Medium, Mod Podge or other favorite wet adhesive
- Paints with Brushes, I’m using the new Claudine Paints by Ranger but any acrylic paints will do.
- Sand Paper and Sanding Block
- Aluminum Metal Foil – about 36-40 gauges will work well.
I’m working with a cigar box as my card keeper. Any paper mache box will do and use your imagination, you don’t have to make a card keeper either. A journal, a clock, a photo frame, almost anything can be covered in metal.
Today we are going to prep our Cigar box. I used Gesso to cover the wood grain look on my box. If you are using a paper mache box, you may not need this step.

Once completely dry, I sanded off an area that was bumpy. You’ll want to make sure that the top part of your box, the area that’s going to have the metal embossing on it is as flat as you can get it. If you have bumps, it might show through on your metal when you lay it down.

Once the outside was dry, I painted the inside edges. I’m going to place Holiday paper in the top recess and the bottom recess but I need to paint the edges first. I painted the flat edge and the inside edge of the inside of the box. I used Ranger's Studio Paint in Sable Brown. It’s nice and creamy and thick. Any acrylic paint will do for this step. The key is to cover completely any areas you want covered. Some paints will take several coats. Before painting the bottom, I did remove some cedar planks that were fitted into the box. Your box may or may not have these. Removing them is your choice as well.

I painted the inside edge of the bottom with Ranger's Studio Paint in Modern Red. Once dry, I measured my inside edges and cut some Holiday paper to cover the top and bottom edges.

I used the Studio Multi-medium in Matte to ‘glue’ the paper to the top and the bottom and then I also used it as a glaze over the paper. I did have a few bubbles in my project but I’m happy to say, when they dried, they dried flat. The key is to add thin layers of multi medium.
*Not pictured, I painted the top lid of the box the same Modern red and I added Holiday papers to the bottom outside edge. I adhered the paper with the Multi Medium and I then added a thin layer of multi medium over the paper too.

Tomorrow, we’ll emboss our metal. I used a piece of aluminum metal that just fit the top of my cigar box…

While I used a piece of Copper colored Art Metal from 10 Seconds Studio as well as their tools, remember you can use a top to a large disposable aluminum party pan and some basic supplies you might have at home. Here’s a photo for reference…
Wednesday, December 2, 2009
Holiday Card Keeper
I've been thinking... I've been a bad blogger lately. Other than not updating regularly, I also haven't done any projects or free tutorials lately. Tsk.. tsk on me!
So, I was thinking.
Last year I taught a Holiday Card Keeper class online to a Yahoo group that I belong to. Here it is:
And it occurred to me that I should post these directions here. For you... out there in blogland.
This class spanned 4 days online so I'm going to do the same here. I'm going to post the supply list today and then set up the blog to post a new lesson at 8AM EST each day for the next 3 days. If you have any questions along the way or at the end, post them here and I'll answer them here online too.
If you decide to try this out, feel free to use whatever stamp set you have and like. The women in the Yahoo Group that tried this all used different stamps and they each came out beautifully. For these techniques, you won't be able to use word stamps, once embossed the words will be backwards. Other than that... try it. It's easy and fun! AND! I tell you how to emboss using cheap materials that you may already have at home!
Here's the Supply List, come back tomorrow for the first set of directions: Have Fun!
Supply List:
Box with lid – I’m using a cigar box, it measures 8 ¼ x 7 ¾ x 3, any Paper Mache box will work too.
Holiday papers
Gel Medium, Mod Podge or other favorite wet adhesive
Paints with Brushes, I’m using the Studio Paints by Ranger but any acrylic paints will do.
Sand Paper and Sanding Block
Aluminum Metal Foil – about 36-40 gauges will work well. **See below for a tip on this**
Stamps, any of your favorite images will work. Don’t use ones with words for your first design.
Staz On or Archival Ink, any color is fine although a dark color is best.
Tracing paper or words printed backwards.
Paper Stump - or popsicle stick
Refiner tool – or empty ball point pen
Ball and Cup tool – or medium sized stylus
Thin Mat - or mouse pad
Acrylic Mat - or glass cutting mat
Small Wheel Tool – I use the ones by Ten Seconds Studio but Merc Art makes some and there are even some that quilters use. This past Halloween we bought a pumpkin carving set and it had a wheel tool in it that will work too!
Brass Brush - you can purchase one of these in your local hardware store. The hardware store one is bigger but will still work in a pinch.
Lightweight Spackle
Humungo - or Red Line Tape. You can also substitute strong glue. I’ve used The Ultimate with great results.
**The metal I used is a 40 gauge aluminum sold by Ten Seconds Studio. They make several different color coated metals.
If you don’t own metals by Ten Seconds Studio, you can use the metal foils made by Amaco or Merc Art as well.
OR - If you can’t get your hands on any of this metal foil, an alternative to this would be the top to an aluminum party plan. These can be found in your local super market, Wal-Mart or any party planning stores. I’ve bought mine for as little as 49 cents! If you choose the bottoms, you will find that they have too many creases and that many are stamped with a logo. This molding and stamping are hard to get out – and could be impossible so I’d just stick with the tops. Many times you can buy the tops seperately.
Check back tomorrow morning for the first part of the directions for this Holiday Card Keeper box.
Subscribe to:
Posts (Atom)
-
 Welcome to the first ever Dreamweaver Stencils Dream Team Blog Hop! Today is day one of this three day long blog hop. There's lots to ...
 -
 Happy Valentine's Day!!! I was going to do a little mini Card but decided that maybe now is the right time to offer something special ! ...
 -
 I'm short on time this week but I do have another Dreamweaver card for you today! This week we were Challenged with using the Blue Glo...