Tuesday, May 12, 2009

My Mailbox...

Last October, I spray painted some metal, embossed it, sanded it and stuck it outside... for the Winter! In mid February, during a thaw, I went outside, searched through the dirty, melting snow for my metal pieces and took these pictures...


Now, I live in New England. South of Boston as a matter of fact, and we do get some snow. Lots, some years. This past Winter was one of those years. Lots and lots of snow.
I don't know if you can tell from the photos but the black embossed piece is the Rock Star Black metal from Ten Seconds Studio. The yellow, was something I spray painted. On the back of the yellow is the Copper color - I used the Art Metal Copper from Ten Seconds Studio. Both pieces were embossed, even though it's harder to see on the copper colored one. It's there. And it didn't flake off! The Rock Star Black flaked off just a bit but the copper colored one was something to work with!
Last year, Robin from Blue Hills asked me to do a mailbox class. After some research, I decided that it should be pretty easy. Unfortunately the class didn't run and so I forgot about it. Well the other day a woman called Bev at the Scrapbook Cupboard and asked about my mailbox. And I thought, I haven't posted photos of that yet, I should do it today. It's beautiful out! So, while taking a break from getting ready for a busy upcoming weekend, I took some photos and thought I'd post them....

Look, I haven't even taken care of the snow shovel yet, you just NEVER know when snow will fall here in New England. - Although I think I'm safe and can properly hang it until Fall.
Here are a few more close up shots...


It's like no other mailbox on the street, that's for sure!

Monday, May 11, 2009

It smells beautiful...

The wind is blowing just enough here that all I can smell is my lilacs. And they smell wonderful!


The plain purple lilacs and the white ones are completely in bloom. My Sensation Lilacs are almost there...


Can't you just smell them?

Hubby let me sleep in today, Susan came over and we took a nice long walk today, stopping at the library. I read some of the book, played with Bryce and did some grocery shopping. I haven't created anything today and that's OK, I've made time to stop and enjoy life.

I hope you do too. The lilacs won't last much longer...

Sunday, May 10, 2009

Happy Mother's Day!


Happy Mother's Day to all those Mom's out there. Whether you have children, someone else's children, fur babies or you are the reluctant mama to some ants in your basement... this is your day! Enjoy it!

I made a little card last month for my Copic Collection Club Class at the Scrapbook Cupboard. I used a Magenta Stamp as well as V12, V15 and V17 Copic Markers. I covered the Violet Copics with the purple Spica and then cut it out and layered it on top of the same Violet colored flowers. I love the tiniest bit of dimension. Perfect for mail travel!

Enjoy the card. I'm off to football today and then a trip to Dick Blick in Boston and some time out with friends tonight. Enjoy your day! Happy Mother's Day!


Friday, May 8, 2009

Classes booked in Warner, NH!

Do you live near Warner, NH?? I'm going to be up there at Wingdoodle on Saturday, June 13th for 2 classes. The first from 10AM - 12:30 PM is the Metal Embossing Basics.


Then from 1:30 until 4PM, we'll be continuing on with a Mini Metal Album. I created something just like this last year but retooled it using the new 3 Bugs in a Rug Papers and new Spring/Summer Colors. This little mini book actually boasts 6 metal techniques! It also has a Ranger technique I came up with too. Again, it was an invention born of necessity. I know my friend, Lynne would love to know about it, so maybe I'll do a non-metal tutorial next week. She's a Ranger junkie! And this new technique uses two widely popular Ranger products!

Here's a peek at the completed book. I really enjoy how this one came out. Pretty colors - bright for me - and loads of metal in a little package!


I really enjoy the last page. I love the colors and the contrast of the image. And the best part is that it's completely flat! No spackle needed on the last page!

I have some more classes to post on the left sidebar. Maybe I'll see you at one of them!!

Thursday, May 7, 2009

A new tutorial! - Colored Spackle

OK, so I came up with this idea last year and I've used it a couple of times on some projects. I created it out of necessity, isn't that the Mother of invention!! See I wanted to create an album from the Maya Road Sheers and I wanted to accent it with some metal - of course! But if you know anything about metal, you know that when you emboss it, you should fill it with spackle. And then when you fill with spackle, you can't then just use it on the Sheers album, you'd see white spackle on the back. Yuck!

So, here's my solution...


Run your piece of metal through the Cuttlebug, using an embossing folder.


When it's done, the piece of metal will look like this. Pretty, huh! By the way this is Rock Star Black 40 gauge metal from Ten Seconds Studios.


When I'm using the Cuttlebug Folders, I like to sand the metal right on the folder itself. This will help keep the design rigid so that you don't sand the open areas of the design accidentally.


After Sanding, you want to be sure you wipe off the sanded dust. I use a cotton cloth - the infamous 'inky binkie', a term coined by Tim Holtz when I attended Ranger University.


Flip the metal over and spackle the back. Remember, spackle likes to attach to itself, so slather on a good amount, then wipe off the plastic scraper so you don't continue to 'pick up' more spackle with the spackle on the plastic scraper.


Smooth it out and clean up the spackle. It takes some practice but if you have a flexible enough scraper and some smooth spackle (always cover when not in use), you can achieve a perfect spackle job. What you want is to be able to see the image clearly. Just like above.


Now... let your spackle completely dry!!!


And then....

Here's the key ingredient. Colorwash. Or glimmer Mist. Or Memory Mist or any other kind of spray mist you can spray. The reason behind the spray is two-fold. One, it's not going to rewet the spackle too much. And two, you're not rubbing the spackle.


You can add a little or a lot - depending on what color you'd like to achieve!

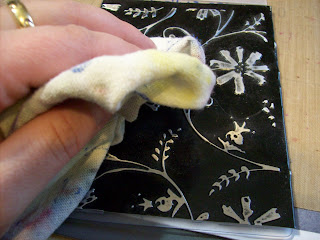
Then with a cloth, wipe the colorwash off in a horizontal motion. Almost the same way you'd sand the metal, you want to remove the colorwash. You'll notice a few things happen. One, if you had any spackle on the metal that wasn't in the design, the colorwash will wet it enough that it's removed pretty easily. And, if you wipe cleanly you'll see that it creates a pretty mirror like finish. Now, remember! Do NOT wipe hard. Gently remove the excess colorwash. The spackle will be slightly damp and you could easily put a dent into it or pop it out if you are too rough with it. But if done correctly, you can easily achieve this next look...


Nice, huh!


Let this dry and you're ready for your project!


Add some Humungo (or red line) adhesive. The beauty of this adhesive is that it's crystal clear! So not only is it the stickiest stuff on earth, it's clear as well so you can use this technique and see the beautiful coloring job you did underneath!

Here you can see I've attached the piece to a piece of a Maya Road Sheer Album. The Sheer Album has a slight color to it, so it's obvious to say it's not as vibrant and as mirror like as it would be if you used it on a clear acrylic album but for the project I've created, this is the look I'm aiming for.

So, I hope you enjoyed today's new technique. I'd love to hear what you think about it. And if you use it, please let me know and tell people where you saw it!


Enjoy!

Wednesday, May 6, 2009

Kim's Creative Home...

I've been reading this book about starting a creative journal, it's called The Creative Entrepreneur: A DIY Visual Guidebook for Making Business Ideas Real by Lisa Sonora Beam. So I decided a while ago that I should do it.

It's taken me a while, you know from my previous post that the beast thing was working against me.

But I put my mind to doing some tasks that would ultimately help me out. Later this month the Scrapbook Cupboard is having a yard sale, so I've been busy in the last week or so organizing my studio. Pulling out all that Scrapbooking stuff and mini albums, stickers, kits, premade books, stamps and anything else that was cluttering me. And I was left with some room. Some room for inspiration.

Couple that inspiration with my need to rid myself of those ugly beasts holding my creativity hostage and I decided to start my Creative Home. It's just a start but, I've been doing well. Actually, I've been doing so well today that I created a tutorial for you guys too. That will be posted tomorrow morning after my walk. I promise! It's already done, I just wanted to show you my house first.

So, here's the beginning of my creative journal. A picture of Kim's Creative Home. And yes, I changed the walkway. The 'pebbles' were still a little wet when I photographed it. It'll dry clear and hopefully none of my pebbles will ever fall off.


Be sure to come back tomorrow morning. I'm going to see if the automatic post thing works... either way, as soon as I'm back from my walk I'll check. It'll be posted before 11AM EST. It's a new technique that I created. Pretty cool!

Monday, May 4, 2009

Taming the Beast...

If you've been reading my blog the last month, you've known that I've been in kinda a creative slump.

If you've ever been in a 'creative block', you know that getting out of it takes some courage. Lately, whenever I open the door to explore my creative mindset, there's a beast there guarding it. And just like any wild beast, when I open the door it either charges at me snarling or it hides in the corner wimpering. Neither is fun to work with.

I've found myself either running the other way and deciding that 'anything' is more important than standing down the beast - or - I gaze upon the beast and decide how best to approach, being frightened of it myself and ultimately giving up on it.

Now, of course these are all metaphors. But somehow I think that this beast needs to be my friend in order for me to reach my creativity. Be that my muse or just my clear thought process.

Saturday night I had to stand in the room with the snarling, cowering, biting, wimpering beast and create. Whether any of us liked it I had an assignment due and... well, personally I'm sick of being in a creative slump.

Then Saturday night I realized something.

See, I've been in creative slumps before. And the last time was about a year ago. (Evidently Spring is not my most creative time. How interesting.... ) But anyhow, last time I was in a creative slump I created a layout with a house and it broke me free. It was a pretty layout that had a flower patch in the front. Actually I have a photo of it...


This was created for Dana's "Look What I Found" circle journal.

Well what I realized on Saturday night was a small formula to my creativity. I needed to create a house. And it's just possible that I need to create that house for someone else, since I was working in Marissa's "treasured Trinkets" circle journal.

Interesting.

So after sleeping this evening from 6:30PM until about 11PM, I'm finding myself awake. I think I'll make a cup of tea and create a few houses.

Maybe those beasts just need a new place to live?!

School's out ...for Summer?

Last night the Governor of Massachusetts cancelled all school until May 4th.  He did this on March 25th.  That is about 6 weeks of no sc...