OK, so I came up with this idea last year and I've used it a couple of times on some projects. I created it out of necessity, isn't that the Mother of invention!! See I wanted to create an album from the Maya Road Sheers and I wanted to accent it with some metal - of course! But if you know anything about metal, you know that when you emboss it, you should fill it with spackle. And then when you fill with spackle, you can't then just use it on the Sheers album, you'd see white spackle on the back. Yuck!
So, here's my solution...
 Run your piece of metal through the Cuttlebug, using an embossing folder.
When it's done, the piece of metal will look like this. Pretty, huh! By the way this is Rock Star Black 40 gauge metal from Ten Seconds Studios.

When I'm using the Cuttlebug Folders, I like to sand the metal right on the folder itself. This will help keep the design rigid so that you don't sand the open areas of the design accidentally.
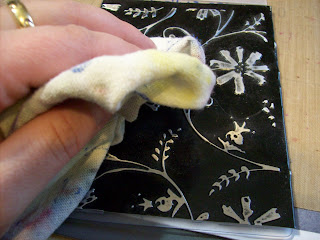
After Sanding, you want to be sure you wipe off the sanded dust. I use a cotton cloth - the infamous 'inky binkie', a term coined by Tim Holtz when I attended Ranger University.
 Flip the metal over and spackle the back. Remember, spackle likes to attach to itself, so slather on a good amount, then wipe off the plastic scraper so you don't continue to 'pick up' more spackle with the spackle on the plastic scraper.
 Smooth it out and clean up the spackle. It takes some practice but if you have a flexible enough scraper and some smooth spackle (always cover when not in use), you can achieve a perfect spackle job. What you want is to be able to see the image clearly. Just like above.
Now... let your spackle completely dry!!!
And then....
 Here's the key ingredient. Colorwash. Or glimmer Mist. Or Memory Mist or any other kind of spray mist you can spray. The reason behind the spray is two-fold. One, it's not going to rewet the spackle too much. And two, you're not rubbing the spackle.
You can add a little or a lot - depending on what color you'd like to achieve!
 Then with a cloth, wipe the colorwash off in a horizontal motion. Almost the same way you'd sand the metal, you want to remove the colorwash. You'll notice a few things happen. One, if you had any spackle on the metal that wasn't in the design, the colorwash will wet it enough that it's removed pretty easily. And, if you wipe cleanly you'll see that it creates a pretty mirror like finish. Now, remember! Do NOT wipe hard. Gently remove the excess colorwash. The spackle will be slightly damp and you could easily put a dent into it or pop it out if you are too rough with it. But if done correctly, you can easily achieve this next look...
 Nice, huh!
 Let this dry and you're ready for your project!
 Add some Humungo (or red line) adhesive. The beauty of this adhesive is that it's crystal clear! So not only is it the stickiest stuff on earth, it's clear as well so you can use this technique and see the beautiful coloring job you did underneath!
 Here you can see I've attached the piece to a piece of a Maya Road Sheer Album. The Sheer Album has a slight color to it, so it's obvious to say it's not as vibrant and as mirror like as it would be if you used it on a clear acrylic album but for the project I've created, this is the look I'm aiming for.
So, I hope you enjoyed today's new technique. I'd love to hear what you think about it. And if you use it, please let me know and tell people where you saw it!
Enjoy!


2 comments:
wow!!! I need to take a metal class!!! or like 7 of them...
I am PROUD...to know you!!! Awesome...solves the "see through" issue with style!!!
Might be going by the store today...feel the need for Metal and supplies!!!
I think the beast came to my house to visit....I finally sent him on his way....I hate design BLOCK!
Post a Comment